An electric guitar’s reliance on internal electronics for sound production can sometimes be a pain…like when you plug in your guitar, and no sound comes out. So what causes this problem?
A guitar that’s cutting out or crackling may be the result of a faulty cable. This is the most common issue, but there are several others, including loose or improper wiring at the output jack, pots or pickup selector switch. It may not even be your guitar at all, but instead an issue with your amp.
A crackling guitar is annoying, but before you go smashing your guitar like you’re at a rock concert, try out these fixes first.
1. Bad Cable
Let’s start with the most common (and easiest to fix). If the cable connecting your guitar to your amp is faulty, it won’t effectively transmit a signal between the two. This issue is most prevalent in cheap guitar cables…something I’ve been guilty of purchasing numerous times ($50 for a guitar cable?? No thanks!)
Even the most expensive cables can short out over time.
The wiring at either ¼ inch connector can become loose or disconnect entirely as the solder holding them in place breaks down.
If you store your cable by wrapping it up tightly, you may be putting a kink in the cable, similar to kinking a garden hose and preventing water flow.
If your cable has noticeable bends that don’t flatten out, this could indicate damage. To test if your cable is the problem, plug your guitar in and turn the amp on.
Then grab the cable near the guitar output jack and amp input jack and wiggle it gently. If you hear any crackling or your guitar cuts out, the cable may be the cause.
Or you can test it this way:
How to Fix It
First, unscrew the threaded cover at each connector end and take a look at the wiring. If it appears loose or is disconnected, you can solder the wires back into place. If you don’t have a soldering iron or aren’t comfortable doing this, you may want to just replace the cable.
If the cable is kinked severely, this really isn’t repairable and the cable will need to be replaced. If you’ve been buying cheap cables (like me), this may be a good time to invest in a quality one that will last a lot longer.
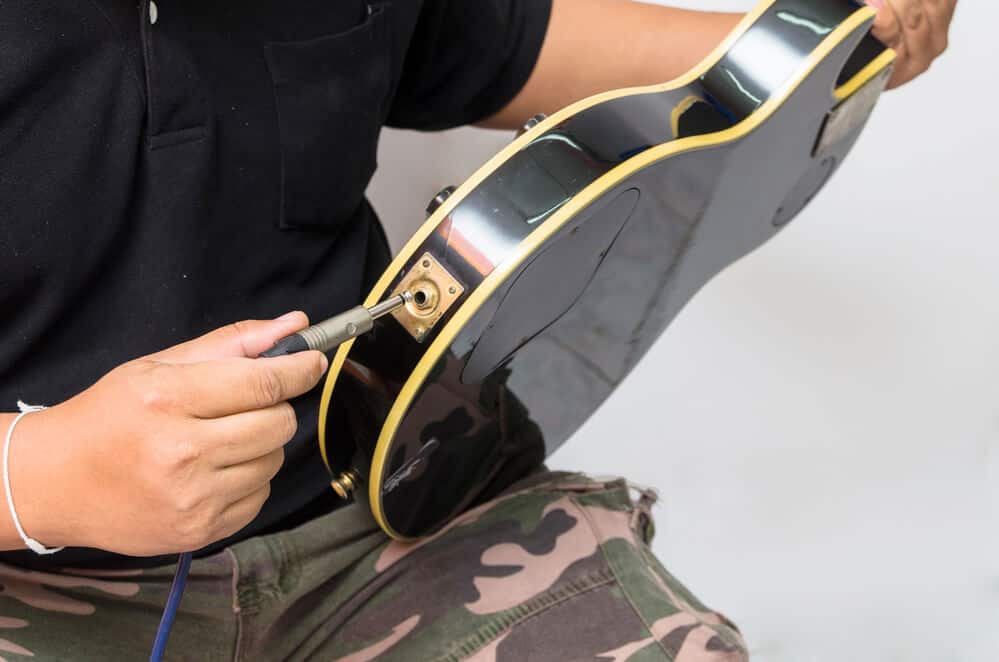
2. Dirty Pots/Pickup Selector Switch
If it moves on your guitar, it means there’s just enough space for dirt and dust to work their way in.
Let’s start with the pots. Short for potentiometers, these are the variable resistors that control your guitar’s volume and tone. Over time, dust and dirt can find their way in between the control knobs and the guitar body. If they do so, they can interrupt the signal being transmitted.
If you turn your control knobs and hear a crackling sound or the guitar cuts out, the pots may need to be cleaned.
The pickup selector switch lets you decide which pickups you want to transmit a signal from your guitar strings to the amp. In essence, it turns some pickups on while keeping others off. Dust can also work its way into the crevices around the selector switch.
If your guitar crackles or cuts out completely when you move the selector switch to different positions, it’s unlikely to be an issue with the pickups themselves, but with the selector switch. This should be a relief, as this is a much easier (and cheaper) fix.
How to Fix It
Before taking anything apart, try rapidly rotating the pots and/or selector switch back and forth several times. This could be enough to shake loose any dust.
If that doesn’t cut it, you can remove the pot covers and selector switch knob and spray some electronic cleaner inside. Then wipe off the excess with a clean dry rag. This should be enough to clean out the offending dust.
Just be sure to use an electronic-specific cleaner: regular household cleaning or dusting agents aren’t designed for use on electronics. Here’s a video that shows an overview of this cleaning process:
3. Pot/Pickup Selector Switch Wiring is Faulty
If cleaning out the dust didn’t fix the issue, the problem may be caused by faulty wiring.
On the back of your guitar you’ll see a panel that houses the wiring and internal electronics controlling the pots and selector switch. This will be two separate panels if you have a guitar (like a Les Paul) where the pots and selector switch are far apart.
Unscrew the panel(s) and take a look inside. You should notice a number of wires. Some wires will be exposed and connected to each pot terminal. These are known as “hot” wires, as they’re actively carrying a signal. Others will be shielded with a braided wire: these are “ground” wires.
When you adjust the volume, tone or pickup selection on your guitar, the hot wires carry the signal to the resistors and effect the desired change. However, if the hot wires become loose or disconnected from the terminals, the signal is cut off.
Ground wires connect every metal component on your guitar, and are essential for the safe travel of electricity from guitar to amp. They also help dissipate unwanted feedback from electromagnetic interference (EMI) that’s all around us.
If the ground wires become loose, disconnected, or the shielding frays, your guitar will pick up noise from EMI in your surroundings, resulting in muddled sound. Since ground wires help safely transmit an electric signal, you also run the risk of damaging your guitar or possibly injuring yourself.
While rare, a number of guitarists have been shocked by ungrounded guitars, and one even died. So it’s important to make sure your guitar is properly grounded not just for better sound, but for personal safety.
How to Fix It
Check the hot wire connections: if any are loose or have become disconnected, you can re-solder them into place.
The same can be done for the ground wires: if they’ve detached from their connection points, you can reattach them with a little bit of solder.
Before you attempt this, make sure your guitar is unplugged from your amp. This will prevent any damage to your guitar or injury to yourself. And be sure you’re certain where to connect everything: if you’re not, consult a guide for your specific guitar model, or take your guitar to a professional who can do it for you.
4. Ground Wires Too Long
If you have a good quality guitar, this problem will rarely happen in the factory, but may result if you decide to replace your guitar’s pickups yourself.
Ground wires are there to ensure a safe path for an electric signal to flow from your guitar to your amp. However, they can sometimes be too good at their job. If a ground wire touches a hot terminal on a pot, it will short out the signal…not ideal for sound production.
If your ground wires are all nice and tidy, this shouldn’t be an issue. But if you’ve left them too long when replacing your guitar’s internals, they can easily contact the hot terminals when you put the cover back on your guitar and everything gets squished down.
If your guitar only cuts out when you hold it a certain way or put pressure on the back panel, lengthy ground wires may be the culprit.
How to Fix It
To solve this issue, you’ll need to disconnect the offending ground wire from one of its attachment points, trim it to the correct size, and then re-solder it in place.
To prevent the shielding from contacting the connection point, you’ll need to trim it back as well; even a single shielding filament is enough to cut out the signal and silence your guitar.
Check out the video below for a tutorial on how to do this:
5. Faulty Output Jack
As the sole connection point between guitar and amp, your guitar’s output jack serves an important role. But it could also be a potential problem area if your guitar crackles.
You can diagnose a faulty output jack the same way you would a bad cable. Plug your guitar in, turn the amp on, and wiggle the cable near the output jack.
If you hear crackling or the sound cuts in and out, and it’s not the cable (because you’ve replaced it already or tested it on a different guitar with no issues) your output jack may need to be replaced.
How to Fix It
Though it may seem daunting, output jacks are actually easy to replace. They’re also relatively cheap. Check out the video below if you want to tackle this job yourself:
6. Faulty Amp Tubes
A crackling guitar may not indicate a problem with your guitar at all. The issue could in fact be found at the other end of your guitar cable: the amp.
Guitar amps come in two varieties: solid-state amps or tube amps.
Solid-state amps use electronic transistors to produce amplification. They also sound much cleaner and resist distortion when played at maximum volume. However, guitar players tend to want a bit (or a lot) of distortion when playing, as a guitar can sound brittle and tinny without it.
This is why tube amps are preferred by many guitarists. Tube amps use vacuum tubes to amplify the electronic signal produced by your guitar’s pickups.
Though tube amps are more versatile and produce a wide variety of sounds, there are a lot of little pieces where something could go wrong. And it could be that the tubes themselves need to be replaced.
But amps tend to have a lot of tubes packed in there: preamp tubes, power tubes, and rectifier tubes. So how do you tell which ones are causing problems?
How to Fix It
With your amp powered down, remove the back panel with a screwdriver. Then power your amp on, take a non-conductive object (like a wooden pencil or drumstick), and gently tap each tube. Never touch the inside of a live amp with anything that could conduct electricity. If you hear a crackle or pop, it’s likely you’ve found your faulty tube.
Replacing tubes is easy: first, power down your amp and wait for it to cool. This could take a while, as those tubes get pretty hot. Once the tubes are cool, you simply need to wiggle them back and forth while applying consistent downward pressure, and they’ll pop right out.
Then you’ll just need to line up the pins on the new tube with the holes in the receiver and wiggle and push them back in.
If you’re replacing a preamp tube, you’ll notice they’re usually covered with metallic sleeves. These can be removed by pushing them up and then rotating them.
If you’re replacing a power tube, it’s a good idea to replace them in pairs. Amps have an even number of power tubes, and tubes are often sold in matched pairs. These pairs have been tested with each other to ensure they draw the same current and won’t negatively affect your amp’s sound.
Before replacing any power tubes, consult your amp manufacturer’s guide to see if there are specific requirements for tube replacement. And if in doubt, it wouldn’t hurt to bring your amp to a professional and have them get it back in working order.
There could be other issues with your amp aside from the tubes, but since cracking open your amp and troubleshooting can be a pretty formidable process, I’d strongly recommend having a professional take a look at it. Unless you have a solid background in electrical work, you may be getting in over your head.